Docker基础技术:Linux Namespace(下)
 在 Docker基础技术:Linux Namespace(上篇)中我们了解了,UTD、IPC、PID、Mount 四个namespace,我们模仿Docker做了一个相当相当山寨的镜像。在这一篇中,主要想向大家介绍Linux的User和Network的Namespace。
好,下面我们就介绍一下还剩下的这两个Namespace。
目录
User NamespaceNetwork NamespaceNamespace文件参考文档
User Namespace
User Namespace主要是用了CLONE_NEWUSER的参数。使用了这个参数后,内部看到的UID和GID已经与外部不同了,默认显示为65534。那是因为容器找不到其真正的UID所以,设置上了最大的UID(其设置定义在/proc/sys/kernel/overflowuid)。
要把容器中的uid和真实系统的uid给映射在一起,需要修改 /proc/
ID-inside-ns ID-outside-ns length
其中:
第一个字段ID-inside-ns表示在容器显示的UID或GID,
第二个字段ID-outside-ns表示容器外映射的真实的UID或GID。
第三个字段表示映射的范围,一般填1,表示一一对应。
比如,把真实的uid=1000映射成容器内的uid=0
$ cat /proc/2465/uid_map
0 1000 1
再比如下面的示例:表示把namespace内部从0开始的uid映射到外部从0开始的uid,其最大范围是无符号32位整形
$ cat /proc/$$/uid_map
0 0 4294967295
另外,需要注意的是:
写这两个文件的进程需要这个namespace中的CAP_SETUID (CAP_SETGID)权限(可参看Capabilities)
写入的进程必须是此user namespace的父或子的user namespace进程。
另外需要满如下条件之一:1)父进程将effective uid/gid映射到子进程的user namespace中,2)父进程如果有CAP_SETUID/CAP_SETGID权限,那么它将可以映射到父进程中的任一uid/gid。
这些规则看着都烦,我们来看程序吧(下面的程序有点长,但是非常简单,如果你读过《Unix网络编程》上卷,你应该可以看懂):
define _GNU_SOURCE
include <stdio.h>
include <stdlib.h>
include <sys/types.h>
include <sys/wait.h>
include <sys/mount.h>
include <sys/capability.h>
include <stdio.h>
include <sched.h>
include <signal.h>
include <unistd.h>
define STACK_SIZE (1024 * 1024)
static char container_stack[STACK_SIZE];
char* const container_args[] = {
"/bin/bash",
NULL
};
int pipefd[2];
void set_map(char* file, int inside_id, int outside_id, int len) {
FILE* mapfd = fopen(file, "w");
if (NULL == mapfd) {
perror("open file error");
return;
}
fprintf(mapfd, "%d %d %d", inside_id, outside_id, len);
fclose(mapfd);
}
void set_uid_map(pid_t pid, int inside_id, int outside_id, int len) {
char file[256];
sprintf(file, "/proc/%d/uid_map", pid);
set_map(file, inside_id, outside_id, len);
}
void set_gid_map(pid_t pid, int inside_id, int outside_id, int len) {
char file[256];
sprintf(file, "/proc/%d/gid_map", pid);
set_map(file, inside_id, outside_id, len);
}
int container_main(void* arg)
{
printf("Container [%5d] - inside the container!\n", getpid());
printf("Container: eUID = %ld; eGID = %ld, UID=%ld, GID=%ld\n",
(long) geteuid(), (long) getegid(), (long) getuid(), (long) getgid());
/ 等待父进程通知后再往下执行(进程间的同步) /
char ch;
close(pipefd[1]);
read(pipefd[0], &ch, 1);
printf("Container [%5d] - setup hostname!\n", getpid());
//set hostname
sethostname("container",10);
//remount "/proc" to make sure the "top" and "ps" show container's information
mount("proc", "/proc", "proc", 0, NULL);
execv(container_args[0], container_args);
printf("Something's wrong!\n");
return 1;
}
int main()
{
const int gid=getgid(), uid=getuid();
printf("Parent: eUID = %ld; eGID = %ld, UID=%ld, GID=%ld\n",
(long) geteuid(), (long) getegid(), (long) getuid(), (long) getgid());
pipe(pipefd);
printf("Parent [%5d] - start a container!\n", getpid());
int container_pid = clone(container_main, container_stack+STACK_SIZE,
CLONE_NEWUTS | CLONE_NEWPID | CLONE_NEWNS | CLONE_NEWUSER | SIGCHLD, NULL);
printf("Parent [%5d] - Container [%5d]!\n", getpid(), container_pid);
//To map the uid/gid,
// we need edit the /proc/PID/uid_map (or /proc/PID/gid_map) in parent
//The file format is
// ID-inside-ns ID-outside-ns length
//if no mapping,
// the uid will be taken from /proc/sys/kernel/overflowuid
// the gid will be taken from /proc/sys/kernel/overflowgid
set_uid_map(container_pid, 0, uid, 1);
set_gid_map(container_pid, 0, gid, 1);
printf("Parent [%5d] - user/group mapping done!\n", getpid());
/ 通知子进程 /
close(pipefd[1]);
waitpid(container_pid, NULL, 0);
printf("Parent - container stopped!\n");
return 0;
}
上面的程序,我们用了一个pipe来对父子进程进行同步,为什么要这样做?因为子进程中有一个execv的系统调用,这个系统调用会把当前子进程的进程空间给全部覆盖掉,我们希望在execv之前就做好user namespace的uid/gid的映射,这样,execv运行的/bin/bash就会因为我们设置了uid为0的inside-uid而变成#号的提示符。
整个程序的运行效果如下:
uid=1000(hchen) gid=1000(hchen) groups=1000(hchen)
Parent: eUID = 1000; eGID = 1000, UID=1000, GID=1000
Parent [ 3262] - start a container!
Parent [ 3262] - Container [ 3263]!
Parent [ 3262] - user/group mapping done!
Container [ 1] - inside the container!
Container: eUID = 0; eGID = 0, UID=0, GID=0 #<---Container里的UID/GID都为0了
Container [ 1] - setup hostname!
uid=0(root) gid=0(root) groups=0(root),65534(nogroup)
虽然容器里是root,但其实这个容器的/bin/bash进程是以一个普通用户hchen来运行的。这样一来,我们容器的安全性会得到提高。
我们注意到,User Namespace是以普通用户运行,但是别的Namespace需要root权限,那么,如果我要同时使用多个Namespace,该怎么办呢?一般来说,我们先用一般用户创建User Namespace,然后把这个一般用户映射成root,在容器内用root来创建其它的Namesapce。
Network Namespace
Network的Namespace比较啰嗦。在Linux下,我们一般用ip命令创建Network Namespace(Docker的源码中,它没有用ip命令,而是自己实现了ip命令内的一些功能——是用了Raw Socket发些“奇怪”的数据,呵呵)。这里,我还是用ip命令讲解一下。
首先,我们先看个图,下面这个图基本上就是Docker在宿主机上的网络示意图(其中的物理网卡并不准确,因为docker可能会运行在一个VM中,所以,这里所谓的“物理网卡”其实也就是一个有可以路由的IP的网卡)
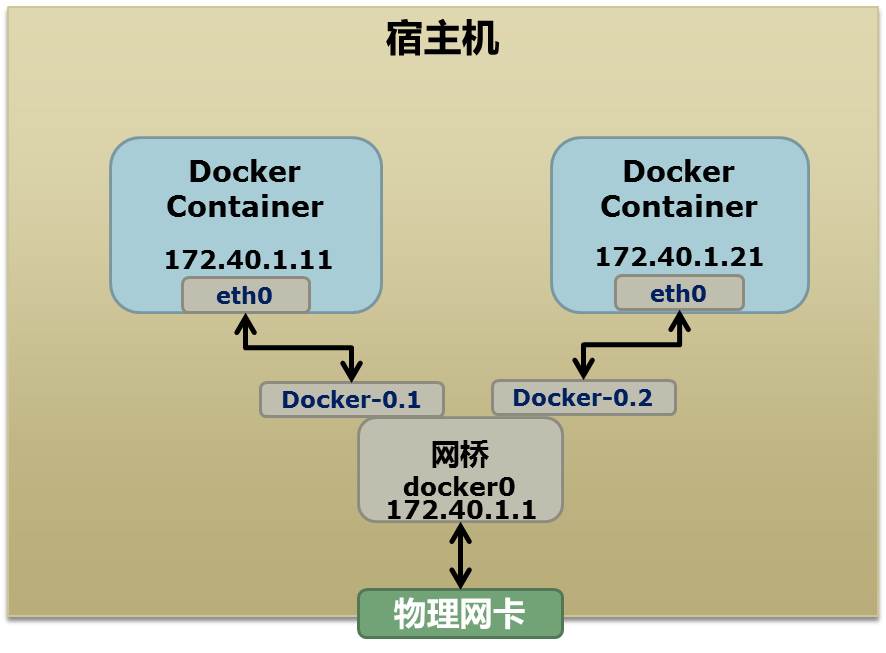
上图中,Docker使用了一个私有网段,172.40.1.0,docker还可能会使用10.0.0.0和192.168.0.0这两个私有网段,关键看你的路由表中是否配置了,如果没有配置,就会使用,如果你的路由表配置了所有私有网段,那么docker启动时就会出错了。
当你启动一个Docker容器后,你可以使用ip link show或ip addr show来查看当前宿主机的网络情况(我们可以看到有一个docker0,还有一个veth22a38e6的虚拟网卡——给容器用的):
1: lo: <LOOPBACK,UP,LOWER_UP> mtu 65536 qdisc noqueue state ...
link/loopback 00:00:00:00:00:00 brd 00:00:00:00:00:00
2: eth0: <BROADCAST,MULTICAST,UP,LOWER_UP> mtu 1500 qdisc ...
link/ether 00:0c:29:b7:67:7d brd ff:ff:ff:ff:ff:ff
3: docker0: <BROADCAST,MULTICAST,UP,LOWER_UP> mtu 1500 ...
link/ether 56:84:7a:fe:97:99 brd ff:ff:ff:ff:ff:ff
5: veth22a38e6: <BROADCAST,UP,LOWER_UP> mtu 1500 qdisc ...
link/ether 8e:30:2a:ac:8c:d1 brd ff:ff:ff:ff:ff:ff
那么,要做成这个样子应该怎么办呢?我们来看一组命令:
首先,我们先增加一个网桥lxcbr0,模仿docker0
brctl addbr lxcbr0
brctl stp lxcbr0 off
ifconfig lxcbr0 192.168.10.1/24 up #为网桥设置IP地址
接下来,我们要创建一个network namespace - ns1
增加一个namesapce 命令为 ns1 (使用ip netns add命令)
ip netns add ns1
激活namespace中的loopback,即127.0.0.1(使用ip netns exec ns1来操作ns1中的命令)
ip netns exec ns1 ip link set dev lo up
然后,我们需要增加一对虚拟网卡
增加一个pair虚拟网卡,注意其中的veth类型,其中一个网卡要按进容器中
ip link add veth-ns1 type veth peer name lxcbr0.1
把 veth-ns1 按到namespace ns1中,这样容器中就会有一个新的网卡了
ip link set veth-ns1 netns ns1
把容器里的 veth-ns1改名为 eth0 (容器外会冲突,容器内就不会了)
ip netns exec ns1 ip link set dev veth-ns1 name eth0
为容器中的网卡分配一个IP地址,并激活它
ip netns exec ns1 ifconfig eth0 192.168.10.11/24 up
上面我们把veth-ns1这个网卡按到了容器中,然后我们要把lxcbr0.1添加上网桥上
brctl addif lxcbr0 lxcbr0.1
为容器增加一个路由规则,让容器可以访问外面的网络
ip netns exec ns1 ip route add default via 192.168.10.1
在/etc/netns下创建network namespce名称为ns1的目录,
然后为这个namespace设置resolv.conf,这样,容器内就可以访问域名了
mkdir -p /etc/netns/ns1
echo "nameserver 8.8.8.8" > /etc/netns/ns1/resolv.conf
上面基本上就是docker网络的原理了,只不过,
Docker的resolv.conf没有用这样的方式,而是用了上篇中的Mount Namesapce的那种方式
另外,docker是用进程的PID来做Network Namespace的名称的。
了解了这些后,你甚至可以为正在运行的docker容器增加一个新的网卡:
ip link add peerA type veth peer name peerB
brctl addif docker0 peerA
ip link set peerA up
ip link set peerB netns ${container-pid}
ip netns exec ${container-pid} ip link set dev peerB name eth1
ip netns exec ${container-pid} ip link set eth1 up ;
ip netns exec ${container-pid} ip addr add ${ROUTEABLE_IP} dev eth1 ;
上面的示例是我们为正在运行的docker容器,增加一个eth1的网卡,并给了一个静态的可被外部访问到的IP地址。
这个需要把外部的“物理网卡”配置成混杂模式,这样这个eth1网卡就会向外通过ARP协议发送自己的Mac地址,然后外部的交换机就会把到这个IP地址的包转到“物理网卡”上,因为是混杂模式,所以eth1就能收到相关的数据,一看,是自己的,那么就收到。这样,Docker容器的网络就和外部通了。
当然,无论是Docker的NAT方式,还是混杂模式都会有性能上的问题,NAT不用说了,存在一个转发的开销,混杂模式呢,网卡上收到的负载都会完全交给所有的虚拟网卡上,于是就算一个网卡上没有数据,但也会被其它网卡上的数据所影响。
这两种方式都不够完美,我们知道,真正解决这种网络问题需要使用VLAN技术,于是Google的同学们为Linux内核实现了一个IPVLAN的驱动,这基本上就是为Docker量身定制的。
Namespace文件
上面就是目前Linux Namespace的玩法。 现在,我来看一下其它的相关东西。
让我们运行一下上篇中的那个pid.mnt的程序(也就是PID Namespace中那个mount proc的程序),然后不要退出。
$ sudo ./pid.mnt
[sudo] password for hchen:
Parent [ 4599] - start a container!
Container [ 1] - inside the container!
我们到另一个shell中查看一下父子进程的PID:
pid.mnt(4599)───bash(4600)
我们可以到proc下(/proc//ns)查看进程的各个namespace的id(内核版本需要3.8以上)。
下面是父进程的:
total 0
lrwxrwxrwx 1 root root 0 4月 7 22:01 ipc -> ipc:[4026531839]
lrwxrwxrwx 1 root root 0 4月 7 22:01 mnt -> mnt:[4026531840]
lrwxrwxrwx 1 root root 0 4月 7 22:01 net -> net:[4026531956]
lrwxrwxrwx 1 root root 0 4月 7 22:01 pid -> pid:[4026531836]
lrwxrwxrwx 1 root root 0 4月 7 22:01 user -> user:[4026531837]
lrwxrwxrwx 1 root root 0 4月 7 22:01 uts -> uts:[4026531838]
下面是子进程的:
total 0
lrwxrwxrwx 1 root root 0 4月 7 22:01 ipc -> ipc:[4026531839]
lrwxrwxrwx 1 root root 0 4月 7 22:01 mnt -> mnt:[4026532520]
lrwxrwxrwx 1 root root 0 4月 7 22:01 net -> net:[4026531956]
lrwxrwxrwx 1 root root 0 4月 7 22:01 pid -> pid:[4026532522]
lrwxrwxrwx 1 root root 0 4月 7 22:01 user -> user:[4026531837]
lrwxrwxrwx 1 root root 0 4月 7 22:01 uts -> uts:[4026532521]
我们可以看到,其中的ipc,net,user是同一个ID,而mnt,pid,uts都是不一样的。如果两个进程指向的namespace编号相同,就说明他们在同一个namespace下,否则则在不同namespace里面。
这些文件还有另一个作用,那就是,一旦这些文件被打开,只要其fd被占用着,那么就算PID所属的所有进程都已经结束,创建的namespace也会一直存在。比如:我们可以通过:mount –bind /proc/4600/ns/uts ~/uts 来hold这个namespace。
另外,我们在上篇中讲过一个setns的系统调用,其函数声明如下:
int setns(int fd, int nstype);
其中第一个参数就是一个fd,也就是一个open()系统调用打开了上述文件后返回的fd,比如:
fd = open("/proc/4600/ns/nts", O_RDONLY); // 获取namespace文件描述符
setns(fd, 0); // 加入新的namespace
参考文档
Namespaces in operation
Linux Namespace Man Page
Creat Containers – Part 1
Introduction to Linux namespaces
(应网友card323加入)
转载于酷壳CoolShell 无删改 仅以此纪念陈皓(左耳朵耗子)
你会用什么样的算法来为你的用户保存密码?如果你还在用明码的话,那么一旦你的网站被hack了,那么你所有的用户口令都会被泄露了,这意味着,你的系统或是网站就此完蛋了。所以,我们需…
前置背景: 有 NAS 、网盘多处备份,所以云服务的可用性、可靠性不那么重要; 主要目的是想方便爸爸妈妈随时看我们的出游照片。 大致是想上传一些 JPG 的图片用于随时看,…
gtx1080 用了 4 年了,之前用的 2k60 显示器,基本什么游戏都能玩。今年 6 月换了 4k144 显示器,3a 游戏带不动了,这几个月就玩玩 lol,显卡价格太贵了…